EQUIPMENT ADVICE: OFF-PISTE SKIS 2022 – 2023
This time it’s for the off-piste module if you are on the January BASI 1 + Off-piste course, or if you are adding an off-piste module after your BASI 1+2.
It’s a big topic as off-piste skis and bindings offer a much bigger range than piste options, but here’s Will’s intro to the best kit out there.
WHY HAVE TWO PAIRS OF SKIS?
Compared with our standard BASI 1+2 instructor courses, our blended off-piste and BASI level 1 training course is slightly more complex when it comes to equipment choices.
The aim here is to have equipment that makes your life easier when trying to achieve the criteria of the BASI level 1 instructor exam, but to also be forgiving in the off piste.
For the level 1 exam you want a piste focussed ski, less than 80mm underfoot and with a turn radius around 13-15 metres. You can read my review of piste skis here.
However, this is obviously very different from a nice easy off-piste ski, which will be roughly 100m underfoot and a lot of rocker in the tip (this is the flappy bit on those big freeride skis you see around the mountain).
Of course, you can ski off piste on a piste focussed ski, but it’s a lot harder, especially when the snow is tricky.
For example, if you have heavy or wind affected snow, narrow skis with a lot of shape can be really catchy and generally hard work. This means you’re more likely to spend more time on the floor!
So we recommend that you have a piste ski for the instructor course and an off-piste ski for the second part of your course. I would also say that any keen skier who enjoys on and off-piste skiing should probably own both anyway.
However, if that seems like too much, you could rent for the ski touring days (although this would add up!) and there are some options in the middle ground, some skis that aim to do it all. These skis will essentially have the features of a performance piste ski, but with a little more width and perhaps a little more of a rise towards the tip of the ski.
There is a lot to read but if you take the time to go through the options you will understand much more about what you will need for your course.
CAN YOU JUST HAVE ONE SKI FOR EVERYTHING?
Scenario 1 – I don’t own any skis yet and I can’t justify buying a piste ski and a touring setup
It’s not impossible but also not ideal. If we look at the “jack of all trades” options, you must remember these will not be as good as a pure piste ski for your BASI 1 and not as good as a pure off-piste ski for the off-piste module.
The Head Kore X 85 which is slightly more off piste focussed as the skinniest version of their main freeride ski. But at 85mm and with a roughly 15m turn radius, it will still perform ok on piste. Available in both mens and women’s sizing.


Alternatively, you have the Supershape E-Titan or Total Joy (women’s version), which is a better option if you want something that will help you out more during the on-piste part of the course.
If you struggle to carve, or you can’t quite carve yet, these will be a better choice.


Similarly, Dynastar have a couple of options to suit different preferences.
For men, the “Speed 4×4 963” and for women “E 4×4 7”, represent the more piste focussed all mountain ski, good for those who will be new to carving a ski.


For those more confident in their piste skiing ability, the “M-Pro 85” or “E-Pro 85” (women’s sizing) will be a really versatile ski that will perform very well off piste too. There are 90mm wide versions of these too, but this would be very wide to take your BASI Level 1 exam with.


Most good brands have options such as these in their range.
Look within the “all-mountain” part of their range for the wider piste skis which will be more focussed on that BASI exam skiing.
But for something more off-piste focussed, check out the freeride part of the brand’s range.
Rossignol are another good brand to check out, The “Experience 86 Ti” (same name for men’s and women’s versions), is your piste focussed option.


In their free ride range though, the narrowest ski is still 90mm underfoot, so beware – this will be hard work on the piste.
Wider skis on piste are slower from edge-to-edge, requiring more skill and accuracy to achieve grippy or carved turns – which feature heavily in the BASI exam criteria.
WHAT ABOUT A SPECIALIST FREERIDE SETUP?
Scenario 2 – I already have a piste ski and I’d like to buy a touring setup
In an ideal world, for this course you’ll have both a piste ski and an off-piste ski – in fact this really is the best solution where you have a set of proper off-piste skis with modern compact touring bindings.
If you haven’t heard much about touring, this is where the ski can be used to ‘walk’ uphill (with the addition of touring ‘skins’ to stop you sliding back down…) but the bindings’ heal-pieces then lock back down for the descents.
Remember if you want a dedicated piste ski, check out our advice on piste skis for Peak Leaders courses.
A dedicated off-piste ski will offer you a much more forgiving experience in challenging snow, which we simply have to ski during off-piste adventures.
These skis will have an early rise in the tip of the ski, which helps you keep the tips up in soft or deep snow, they will also be softer in flex, so they will be smoother to steer in tricky conditions.
Personally, in Europe I think the optimal width for a dedicated off-piste ski is about 100mm underfoot, this gives you enough float for the deep days but also gives you some responsiveness for firmer conditions off-piste and when you’re tackling steep couloirs, for example.
My top choices are the Head Kore or Dynastar M-Pro (E-Pro for women), these were mentioned above in narrower sizes, but they offer wider options for dedicated off piste skiing.


The new Rossignol “Rallybird” for women and “Blackops” for men also look like good options for this winter.


Of all the off-piste options, the Head Kore range is probably the best when it comes to finding a ski which can shred the downhill but also offers a lightweight construction for ski touring uphill. They have a few models that are wider than the Kore 85s and therefore better for off-piste.


AND WHAT ABOUT BINDINGS?
To complete your ski touring setup, you’ll need a touring binding which can release at the heel and also a ‘skin’ which attaches to the base of the ski, so the ski can grip the snow while you’re walking uphill.
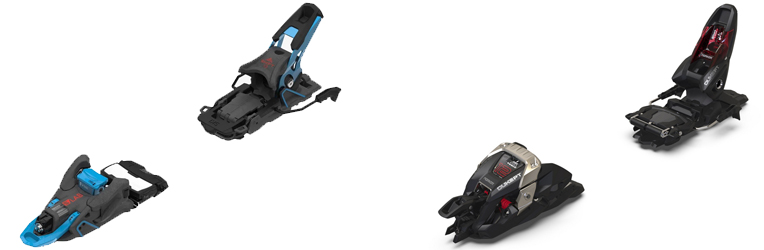
There are two types of touring binding that you should consider. There are “frame” bindings which are compatible with any boot, so if you don’t have a free ride boot with pin inserts on the toe piece (see below), then this is the way to go.
The best option to use with normal boots is the Marker F12 Tour, or F10 if you are lighter and set your DIN to less than 8.

However, if you have a freeride boot with a pin insert, then it’s worth getting a pin binding.
There are some really lightweight full-pin option out there or there are some slightly heavier hybrid options which have much better downhill reliability. I would steer towards the latter.
Some good options are the Salomon Shift (below left) or the Marker Duke ( below right). Both are really simple to step into when in normal ski mode, which is super handy when you aren’t touring!
Then when you go touring, they can be switched into a touring mode very easily where they utilise the pin system.
Finally, you will need some “skins”, these will need to be trimmed to fit your ski, so it is worth paying a visit to your local ski shop to get this sorted as it can be tricky to get right.
If you’re not sure about all that, then don’t worry, you can just rent a touring setup for those days of the course. However this would get pretty expensive as the whole idea of the module is to be able to go touring any day when the conditions are right.
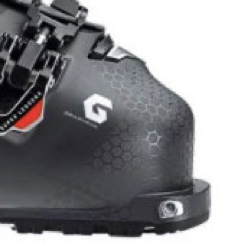
AND WHAT ABOUT THE RIGHT BOOTS?
You have to consider ski boots.
You can ski off piste in any boots, but if you are going touring there are a few things to think about.
You can opt for a standard boot for the “frame touring bindings” I described above, or a Freeride boot for either frame bindings or the “pin bindings”.
The latter will offer you some features that make those off-piste days that little bit easier/more comfortable – freeride boots have a grippier sole (good for those little boot pack hikes to access that untouched powder field), a walk mode for any walking uphill and are also a lighter construction.
A freeride boot also usually has a pin binding compatibility, so if you are getting a ski touring setup with a pin binding, make sure you have this compatibility on your boot.
But remember that you don’t have to get a pin binding boot for a frame biding. Many of our coaches use the same boots for touring and piste skiing by using a frame binding like the Marker F12.
Women should be looking at boot flex around 90-110, if you’re taller/heavier then higher flex would be preferable.
For guys, look at 110-130 flex rating.
This is the same whether you go for a standard or freeride boot.
I won’t go into specific boot options here because the right boot for you depends on your feet…
The best thing for you to do is pay a visit to your nearest boot-fitter and they can get you sized up. Just use the guide above so you know what to ask them for.
There is a lot of information here, so please get in touch if you’re not sure about anything.
These are the skis that I know work well for this course, but there are loads of other options out there too.
In truth the best option for the L1 + Off-piste module is a pair of piste skis with conventional alpine ski boots, plus a pair of skis with touring bindings for off-piste.
If you want to get touring boots too so you can use pin bindings, then that’s great – but, of course, you’re investing more in your kit.
Finally, don’t forget to check out our next blog on the off-piste safety gear!